• Welcome to the new COTI server. We've moved the Citizens to a new server. Please let us know in the COTI Website issue forum if you find any problems.
  • We, the systems administration staff, apologize for this unexpected outage of the boards. We have resolved the root cause of the problem and there should be no further disruptions.

Optimal drive usage

spank

SOC-13
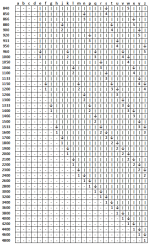
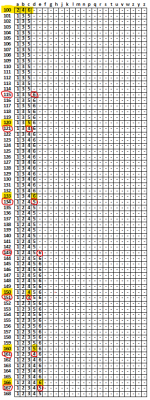
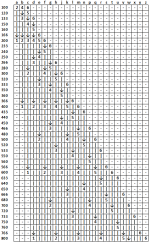
Here is another chart I made, This one shows the optimal size hull for each drive by potential.
The table is fairly simple to use,
Select the hull size you want, any numbers shown indicate this is the optimum size drive to produce that drive potential.
If there is a dash, or arrow then you need to use a large or smaller hull.
For example, if you want a jump 2 ship bigger than a 200 ton far trader then next biggest hull that doesn't waste any of the drive's potential is the 300 ton hull.
If you want a J-3 ship the next biggest is a 266 ton hull.
1659756392257.png1659755433992.png
 
{speechless}

"Buh-"

{speechless}


This is too useful! 😭
A chart that finally gives us intermediate tonnage with better granularity than 200 tons steps!


Only possible modification I would want to make to this chart presentation would be adding thicker vertical lines denoting the TL groupings for drives.
A-D = TL=9 | E-H = TL=10 | J-K = TL=11 | L-M = TL=12 ... etc.

That way you don't have to keep flipping back and forth with LBB3 to figure out which drives are available at which tech levels ... the info is included in the chart so you don't need to cross-reference to remember.
 
{speechless}

"Buh-"

{speechless}


This is too useful! 😭
A chart that finally gives us intermediate tonnage with better granularity than 200 tons steps!


Only possible modification I would want to make to this chart presentation would be adding thicker vertical lines denoting the TL groupings for drives.
A-D = TL=9 | E-H = TL=10 | J-K = TL=11 | L-M = TL=12 ... etc.

That way you don't have to keep flipping back and forth with LBB3 to figure out which drives are available at which tech levels ... the info is included in the chart so you don't need to cross-reference to remember.
There are things it doesn't show,
such as the minimum tonnage that can use a drive to a certain potential.
Generally speaking that can be inferred from the chart, except for the j-6 drives.
for example the chart shows that the best tonnage to use an "E" drive at a rating of 6 is 166.
But it doesn't show that the minimum is 143, which isn't really the point of the chart.
it's to tell you the best tonnage to use a drive at.
But it also doesn't show that 150 and 160 ton hulls are capable of using at 6.
That, I think is a mistake. I'll have to make a revision.
1659766897452.png
 
OK,
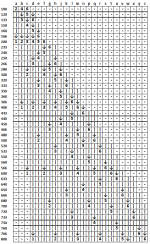
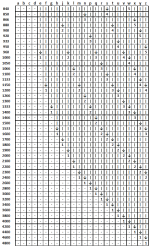
Here are the revised tables,
They are the same, except now the sub-optimal installations for P-plant/drives with a "6" rating are shown.
If there is a - on the chart the fitment will produce less than 0 or more than 6
If there is a number on the chart this is the best fit for that drive/hull combination.
If there is a | or ↓ use a large hull to get the best fit.
1659774156030.png1659774199862.png
 
OK,
Here are the revised tables,
They are the same, except now the sub-optimal installations for P-plant/drives with a "6" rating are shown.
If there is a - on the chart the fitment will produce less than 0 or more than 6
If there is a number on the chart this is the best fit for that drive/hull combination.
If there is a | or ↓ use a large hull to get the best fit.
View attachment 3109View attachment 3110

DUDE!! I mean Dude....
 
Perhaps the most useful insight takeaway from this is that LBB2 "standard drives" are really just J1/M1/PP1 drives intended for specific hull size form factors.

A-D drives are TL=9, but are "intended" for 200/400/600/800 ton hulls by default. Putting those drives into smaller hulls "multiplies" their performance profile, increasing their code factor. It's why a C-drive yields:
  • J1/M1/PP1 @ 600 tons
  • J2/M2/PP2 @ 300 tons
  • J3/M3/PP3 @ 200 tons
  • J4/M4/PP4 @ 150 tons
  • J5/M5/PP5 @ 120 tons
  • J6/M6/PP6 @ 100 tons
It's a very simplistic, linear progression of performance.

At TL=10 you get E-H drives, which are once again J1/M1/PP1 drives intended for (larger) specific hull sizes (1000/1200/1400/1600 as it turns out) and which still yield higher performance when installed into smaller hulls. It's why the F-drive yields:
  • J1/M1/PP1 @ 1200 tons
  • J2/M2/PP2 @ 600 tons
  • J3/M3/PP3 @ 400 tons
  • J4/M4/PP4 @ 300 tons
  • J5/M5/PP5 @ 240 tons
  • J6/M6/PP6 @ 200 tons
Again, a very simplistic and linear progression of performance.

There's a kind of "soft limiter" on how high you can go on drive performance and still have enough remaining displacement fraction for everything else you're going to need to put inside the hull (fuel, bridge, computer, weapons, crew staterooms, etc.) ... which L-Hyd drop tanks "bust wide open" due to being able to externalize fuel demands ... but if you're dealing with "clean configuration/all internal" starship designs, the larger fractions needed to be spent on minimum size items such as power plant fuel, bridge and crew accommodations means that high drive performance can come at a pretty steep cost to options such as cargo and passenger capacity within the hull. So when you start "pushing" things to their limits, you start running into some very interesting tradeoffs and "hard truths" regarding just how much stuff you can "shoehorn" into a starship at what sizes, since smaller hulls have more trouble with "minimums that don't reduce" any smaller relative to overall hull sizes.
 
There's two sides to this. The first, as you noted, is the tradeoff between drive capability and performance. The second is the use of minimum/fixed-size components (bridge, power plant fuel*) to handicap smaller ships. Together, they combine for the "bigger is alway better, and higher tech (almost) only shows up in the ability to build bigger drives" paradigm of LBB2.


*don't get me started :) .
 
There's two sides to this. The first, as you noted, is the tradeoff between drive capability and performance. The second is the use of minimum/fixed-size components (bridge, power plant fuel*) to handicap smaller ships.

Note I have always considered the Bridge Slice with it's minimum volume to cover a bunch of encilary equipment, things like Airlock and such.

*don't get me started :) .
But it is so much fun... ;)
 
Note I have always considered the Bridge Slice with it's minimum volume to cover a bunch of encilary equipment, things like Airlock and such.
Agreed. Airlock, corridors, conduits, and sensors not literally adjacent to the bridge.

Landing gear comes out of the "10-20% margin of error" space, though. :)
 
Back
Top